The smallest bedroom is complete! We had waited until all the other rooms upstairs were finished before starting to work on this room for a few reasons. First, it was our storage room for tools, supplies, and furniture while we worked on the master bathroom, master bedroom + closet, and medium-sized bedroom. The plumbing to the new master bathroom shares a wall with this room so we waited until the shower was finished to close the wall up. Also we knew it would be the “easiest” room to finish since it was technically the best room in the house when we bought it 10 months ago! This is what it looked like the day we bought the house:

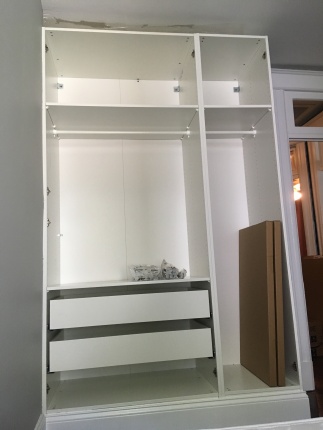
In December of last year, we demolished the original (and tiny!) closet in the corner of the room with the intention of putting in a larger closet. The house suffers from lack of storage space so we decided to do an IKEA hack and create a large ‘built-in’ closet using their PAX closet system. After demo-ing the old closet, we patched up some of the wall that would be exposed. Then….we shut the door and didn’t do anything in this room for half a year.

Honestly the door to this room had been closed for so long I had forgotten what it looked like in there. But after we finished tiling the master bathroom and tested the shower (it worked!!), we were ready to close the wall and finish this small bedroom. After we moved all the crap we were storing in there out, I realized how big it felt! Yes there’s only one window but this room has potential to be a nice sized bedroom or home office.
This room originally had a door to the bonus room (now it’s the master bathroom), so we framed it out and covered with drywall. Jeremy is such an expert at drywalling and compounding that he closed up this wall in one day!
He also easily closed up the HVAC duct with studs and drywall. He really is unstoppable.
Jeremy also added two more outlets to this room, applying his brick-chiseling skills that he learned downstairs. The room originally had only one outlet so this was a must!
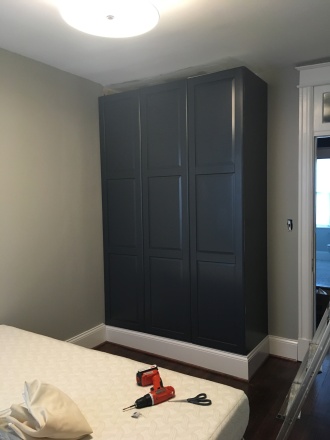
We primed and painted the walls the color Metropolitan by Benjamin Moore (and a huge thank you to Elizabeth for helping me paint the room!!). It is their 2019 color of the year and I am so fatigued of trying to figure out color palates at this point that I figured the best color of the year would work for us! As a contrast, we painted the built in IKEA closet Hale Navy. Jeremy made it look built in by propping it up on a platform and installing baseboard trim around the base. In fact, he cut and installed baseboard trim around the entire room. Again, he is UNSTOPPABLE.
We had removed the window trim last year and put it in the basement for safe keeping. Now we were finally ready to sand it down, re-install, and paint it.
Jeremy replaced the sad dangling light bulb with this beautiful, simple light fixture I found on Amazon for $140. I love it so much….and it brings much needed light into the room! We opted not to install a ceiling fan because the room is pretty narrow and there wasn’t enough space. Will we regret this decision? Only time will tell!

One of the most exciting things we did was install the interior closet organizers. Last year, we demolished the closets in all three of the bedrooms in our house, plus there is no closet of any kind on the main floor of the house. Needless to say, I am PUMPED to now have TWO whole functioning closets in our home! The last thing to do in this room is install crown molding on the top of the closet to hide that ugly patched ceiling, so STAY TUNED!


We got this beautiful bed from a neighbor who was giving it away for free! I couldn’t believe our luck when I saw it posted on our neighborhood freecyle page. It is GORGEOUS and the right size for our mattress. Jeremy’s parents were visiting last weekend so luckily they helped us pick it up and put it together.

And just like that, the smallest bedroom is complete! We still need to install curtains and outlet/lightswitch cover plates, but we had our first guests stay overnight last weekend and they slept like royalty!


